“What’s for dinner?” “There’s nothing to eat” “I’m hungry!”

Sound familiar?
Planning meals is a great step to feeling organised and prepared. Knowing everything is in the pantry or refrigerator ready to go is definitely more calming than staring into the pantry at mealtime wondering what to cook and if you have enough ingredients. Meal planning also saves you money because every time you go into the supermarket you spend money an often it is way more than you intended.
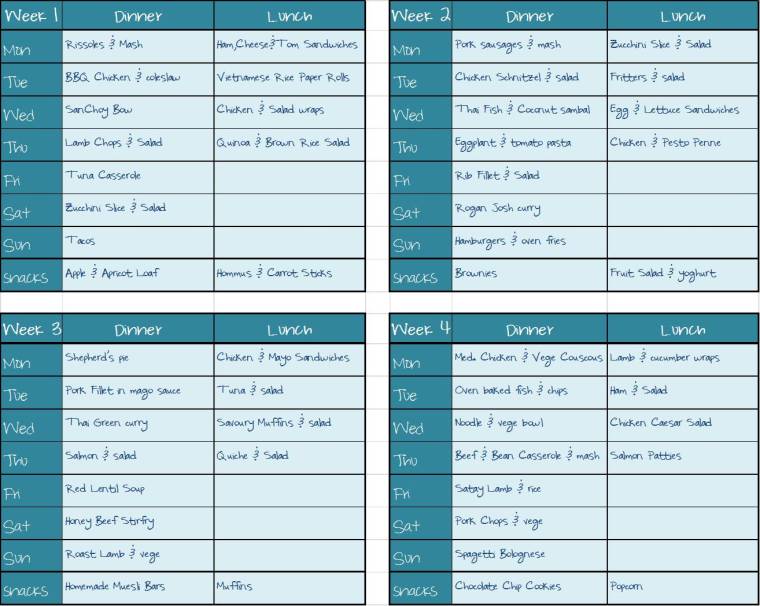
I plan meals for 4 weeks. This gives us variety as we don’t eat the same meal in a month. First step is checking my diary for any events coming up like birthdays, school events, working trips etc and account for those. Take time to investigating what is still in the freezer/fridge and pantry and needs using up. I choose 4 beef dishes, 4 lamb, 4 pork, 4 chicken, 4 fish, 4 vegetarian. One of the children cooks dinner on Sunday night so I pick 4 recipes that are within their capabilities.  menuideas
Then I decide on lunches for Mon – Thu. We have one day per week where lunch is bought so there are only 16 slots for lunch. Weekend lunches may be leftovers, sandwiches or something very basic. Part of this prep is to also plan snacks over the week so I know what needs to be baked on the weekend. I add notes at the bottom like where I found a particular recipe etc.

These ideas are then divide these out over the 4 weeks.

menuplan
The plan isn’t set in concrete. Life gets in the way so flexibility is necessary. Sometimes due to work and/or school commitments Tue week 2 suddenly becomes the slow cooker meal from Thu week 4 so each person can eat and run. An additional friend who stays for dinner may mean not enough sausages that night so swap a menu for another night. Occasionally if we have takeaway for dinner that means there is a meal idea towards the next four-week plan.
This then helps me prepare my grocery list as I can clearly see what food is required. Other household members can easily see what is for dinner and if you are lucky may even start preparing if you are running late.

I have attached blank sheets to download for planning.  meal-ideas-template    and menuplan

“Let our advance worrying become advance thinking and planning.” Winston Churchill


Advertisement

Feeling flat after New Year

The end of the year is always busy. Then boom! The New Year is here and in swing and you feel flat and a little left behind. Have you ever felt that other people appear to be refreshed and take on the challenges of their New Year resolutions but you are lacking the energy to start back at the gym or running 10km?
p1090685That exhausted, irritable feeling accompanied with mental fog could be caused by inadequate diet, insufficient Vitamin B, insufficient magnesium or the incorrect amount of exercise.
Exercise is the last thing you feel like doing but it will improve your fatigue levels. Trust me! Remember to start slow and work your way up. Start with only 10 minutes on the first day and 15 minutes on the next. Then do 20 minutes of exercise, working up to 30 minutes per day in a week. You can increase from this base to work toward your goals. The National Physical Activity Guidelines state that 30 minutes exercise per day is the minimum level for good health. Warning – check with your doctor before starting a rigorous exercise program. Over-exercise can also cause fatigue. This is best dealt by health practitioner.
Making sure your diet has the 3 Fresh (fresh fruit, fresh vegetables & fresh herbs) will also make a difference to your energy levels. Amber coloured foods will help revive you. Some that provide energy are fresh fruits such as bananas, grapefruit, mangoes, pawpaw, peaches. Fresh amber coloured vegetables like yellow capsicum, corn, yellow squash & yellow tomatoes will give you a boost. It is also considered that eating these colours may improve your mood.
Vitamin B is found in seeds & grains, sunflower seeds, almonds, rice bran, legumes, potatoes, mushrooms, soybeans (edamame), spinach, cauliflower and citrus fruits. Proteins for example egg yolks, salmon, dairy products and most meats also contain Vitamin B. Including fresh herbs such as alfalfa, cayenne, dandelion, fenugreek, parsley, sage & watercress can be additional ways to boost your Vitamin B intake.
Almonds, sunflower seeds, pumpkin seeds, soybean, wheat-germ, yoghurt, fish, prawns and green leafy vegetables are all good sources of magnesium. Adding in a few herbs like alfalfa, cayenne, dandelion & peppermint can contribute to maintaining your magnesium balance.
Supplements are always an option to boost your dietary intake of vitamins and minerals. Many of our vegetables are now grown in less mineral-rich soils than before. Storage and cooking can also deplete some of the minerals and vitamins from our food. Supplements are good when dietary intake is inadequate. Be aware that magnesium can affect some prescription medication. Always consult your health professional before incorporating supplements.
p1000647Feeling healthier internally will give more energy and improve your mood. If exercise, diet and supplements are not working and you still feel fatigued, see your health practitioner.

I am not a health professional. The above information is merely information – not advice. If readers need medical advice, they should consult a doctor or other appropriate medical professional.

Purging Your Wardrobe

Confession time.         I have a lot of clothes.       More than I need.      And shoes……. we’ll talk about them another now. My habit of culling my closet had sadly been neglected and it was time to get some organisation back.
I have a large bedroom with a tinsy walk-in robe. Since I have to share with big Al I have less than optimal space for clothes. Usually I will go through my closet at the end of each season and throw out what I did not wear in the past 12 months. I will also check my up-coming season clothes for out of fashion items or where the gremlins have snuck in and sewn the seams tighter.
I used the 3 pile method, “Keep”, “Undecided” & “Dispose of”. Anything to “Keep” was kept on a hanger and put on the clothes airer. I had one pile for “Undecided” and another for “Dispose of”. Working through every article until everything has been moved out of the closet and assessed. This takes time as you need to be ruthless and unemotional.p1010516This is the perfect time to give your closet area a thorough clean. The amount of dust that can accumulate here always amazes me. Vacuum and wipe down walls, shelves, hanging rails and drawers. Now your closet is ready for every “keeper” to be put back.
Organise all similar articles together. All jeans together, next to other pants, then skirts. This way, all bottoms are found in one area when you need to co-ordinate an outfit. Do the same with tops, all sleeve-less together then t-shirts, button up shirts then others, separating Summer & Winter weight. At this stage you could even sort by colour, if you really wanted to make choosing outfits simple. Separate Summer & Winter dresses and hang, doing the same for coats and jackets. Now step back and check it out. Looks good huh?
Now the “Undecided“ pile. Go through each item. Look at what you have kept and ask “Will it match any ‘keepers’?” “Does it fit?” “Do I feel good when I wear this?” If you can answer yes to all of these then put it in your closet with similar items. This is a hard one but you need to be candid in your answers. How many grey t-shirts do you need? If you still can’t decide or are struggling, you may need a second opinion. Ask a friend you trust to be honest in their answer. Or put it in another room or store in a suitcase. If you don’t go looking for it within 3 months then let it go.
The “Dispose of” pile now needs to be sorted. Again use 3 piles, “Bin” “Sell” “Donate”. Any damaged, stained or torn items need to go in the bin. Anything that may be slightly out of fashion or shows signs of wear but are still good can be donated to charity, or given away. Anything still with a tag or only worn once (we all have them), try selling on eBay or other online site. You could have a swap party with your friends and trade any of their discarded items.
Take time to look at your work. You should feel accomplished. There is a liberating feeling that comes from minimising and sorting. Once you have organised things so they are neat tidy and orderly, it saves time and does give a sense of harmony.
The challenge now is to keep it that way. Each week spend 10 – 15 minutes tidying your closet so you can find everything easily.

“being organised isn’t about getting rid of everything you own or trying to become a different person; it’s about living the way you want to live, but better.” Andrew Mellen

Practical Stocking Fillers

christmas-gift-wrapping-picjumbo-com

We give our girls useful items in their Christmas stockings. After years of struggling to find cheap items to add to their stocking only finding that they broke, got lost or were not used at all, we decided that practical was the way to go. They were aged between 15 and 25 at the time and were warned that they would be receiving practical things that they would use not exciting gifts. They each received an expensive larger gift or 2. This was just treats. The only traditional item we continued on with was a box of chocolates which they have always received in their stockings. I try to purchase one thing for their stockings each month.  This adds up to around 12 items.

Each item is individually wrapped in a variety of wrapping paper, usually from offcuts. I wrap them because it adds to the excitement of gift giving. Each of the girls receive the same thing, just the colour or flavour differed. The items cost between 50c and $3 each excluding the chocolates. Many items I found were from the “I need …” range of goodies that cost 99c.
It has become one of the most entertaining times of Christmas Day and the girls have so much fun. They take turns choosing a gift while the other 2 quickly find their similar shaped wrapped item. They have a quick guess at what it could be. Then the race was on to see who can unwrap theirs the quickest. The room is filled with so much energy and laughter.

Ideas for what I have put in their stocking:
a box of chocolates
2 Ulta3 nail enamels
I need… Nail-polish remover wipes
I need… Face wipes
Novelty shaped emery board from IS gifts
I need… a Pedicure set
Novelty shaped lip gloss from Miki. (It came in a 3 pack that I split up.)
Bobby Pins
Hair bands
Flipflops
Lipsticks
Scented candles
Hand cream
Socks
Face mask sachets
Pens
Note pads
Christmas Tree Ornament

I throw in a couple of odd gifts also to change the mix a bit.  It add to the fun when they try to guess what it is.
I need… Hand sanitiser (25ml).
I need… Lint roller (Handbag sized).
I know these are unusual but each of the girls said, “yes I do need one”.
If the budget permits I will find each of the girls a motivational or inspirational book and a small fragrance for their stocking
.

p1000099

Have you any ideas for stocking fillers?

Dressing for the occasion

Recently I was at a conference where the dress code for each function was different. The first night was Cocktail with the next night Casual. The day sessions were Business Casual. The third night was Lounge Suit and the final night was Black-tie. Apart from having to travel abroad with a huge suitcase to fulfil this wardrobe I stressed about the dress standard for each occasion. Being underdressed for “Black-tie” or “Cocktail” would be a faux pas but then so would being too overdressed for “Casual”.

Casual is like “come as you are” but the key is dressing suitably for the event and the company you are with. Nice shorts or jeans teamed with a blouse or t-shirt, a sundress, or a skirt with t-shirts would be appropriate for women. Casual button-down shirts, polo shirts or t-shirts with jeans, long khakis, cargo shorts or khaki shorts would be apt for men. Even with the “come as you are” look casual clothes should not be torn, dirty or have holes.

Smart Casual is probably the most prevalent party dress code but it can be the most confusing. Nice tops or blouses with jeans, pants or skirts or even sundresses are generally safe choices. A blazer is a handy “accessory”. It can basically dress-up your whole outfit. Wear it with the sleeves pushed-up during the day or down for evening. For guys, chinos are a combination of both smart and casual. Dark well-fitted jeans can also be suitable with a button-down shirt. Smart casual shorts are mostly tailored, fitted and above the knee. Again, a blazer for guys will really spruce-up your look.

Business Casual
for girls can vary but traditionally sheath style dresses, or dark shaded pants or skirts, in black, grey or navy have been the safest choices. Teaming these with coloured blouses, scarves or belts add a little personality to your outfit. The casual businessman needs a collared shirts but no tie is required. Crisply ironed pants and a tailored jacket will complete the look.

Lounge suit
is usually the dress code intended for people to attend events straight after work. Conservative is the look required. Girls, a smart dress or business-like attire (think working in a bank) teamed with heels is appropriate. Guys, if possible change from the suit you have worn that day into a fresh, dark-coloured suit, but you can lose the tie if you wish. A jacket or blazer is vital. Jeans are definitely not appropriate.

Cocktail
is a little dress with a knee, or just above, hem length for mademoiselles. Your LBD is a safe bet. Some tailored pants or skirt suit matched with a nice blouse will also work. Choose your accessories with a bit of bling and great shoes. A nice pair of tailored pants and a shirt would be sufficient for gentlemen. Top it off with a blazer or jacket for a more polished look.

Semi-Formal is similar to cocktail dress code. A cocktail dress or tea length dress is quite fitting for ladies. Men should wear tailored pants and jacket with a crisp shirt, tie and jacket.

Black-tie requires a formal gown for women. Generally it should be long enough to touch the floor and should cover enough of your cleavage that some is still left to the imagination. Men should wear a tuxedo or dinner jacket with matching trousers and bow tie.

Formal or White-tie is as formal as you can go. Ladies, a full length ball gown is a necessity. Long white gloves are discretionary. However, your best jewellery and high heels are a must (think Cinderella). Gentlemen, the event necessitates a tail coat, preferably black, with matching trousers. Shirt studs and cufflinks teamed with a white vest and a white bow tie are required. Only black shoes and socks will suffice.

Conforming to dress codes also requires thought about the location. For example, a semi-formal beach wedding would be more relaxed than a semi-formal wedding at a country club.  The host and other guests invited also comes into play.  Is it a work function with employers, that you need to impress or are you with your old friends?

One important key is to always wear clothes that fit you well.  This will constantly look more presentable than ill-fitting clothes that are too tight, too loose, too short or too long.

“A smile is the prettiest thing you can wear” – Unknown

Getting your foundation makeup to stay on

Sometimes I have great trouble getting foundation make-up to stay on. By lunchtime the efforts from that morning are all gone.  There is an array of products out there but which one to choose?

You can use an antiperspirant for your face under you make-up especially on hot or humid days.  Neat Feet Face and NoSweat For Face are both products that work well particularly for those who perspire a lot. They both contain aluminium as most antiperspirants do but there is still debate about the effects of aluminium use.

Pre-foundation Primers allow makeup to go on smoother for more even application and lasts longer.  They smooth & soften lines and appearance of pores. The other benefit is that it keeps foundation colour “true”. Primers are a great pick-me-up for those times when you have been burning the candle at both ends and it is starting to show. Most are used over your moisturiser and applied before foundation make-up in the same way you would apply your moisturiser. The wonderful thing is you can get colour correcting primers for sallow skin tones or for neutralizing redness. Many of the hydrating or lubricating primers are based on soybean extract or silicone.

Powder applied over foundation make-up gives a flawless appearance and also controls oil or shine. The question now is loose or pressed?  Loose powder is more lightweight and gives a more natural appearance.  Pressed powder gives a more flawless look and can be “built” upon (by applying in layers) for a heavier coverage.  Applying powders over the lips can help to also set your lipstick and stop bleeding.

I have found the easiest technique for applying loose powder is with a big fluffy powder brush after your foundation.  Dip it into your powder or shake it out onto the brush and apply in a downward motion over the face. Another great way but slightly messy in your bathroom is the powder rubdown technique. Apply after make-up,  pour loose powder into your hand, and rub your palms together like a gymnast, then “wash” your face with powder from your hairline to your chin. Keep your eyes closed so you don’t get powder in them. Simply brush off any excess with your powder brush.  Powders

Pressed Powder comes with a sponge for ease of application. Simply apply in light downward strokes over the face. Avoid the eye area. If you want a heavier coverage keep applying or “building” layers until you are happy with your look.

On special occasions or days when I am feeling hagged I use both primer, to smooth those life lines, and pressed powder, for a flawless look.  I avoid using powder on my forehead and anywhere near my eyes so those life lines are less distinct.

Finding the Right Foundation

Finding the right foundation can sometimes seem like such a challenge. Matte, Oil-free, Minimal, Anti-aging, Sheer, Mineral, Hypoallergenic, Flawless, Natural, Longwearing. Where to start? Where to start?

  1. Work out the coverage you require.  Do you want a full coverage or a light natural look? Matte finish and long-lasting make-up will generally give you a fuller coverage. Sheer or minimal make-up will give a light coverage. Mineral makeup and powdered foundations can be built up by adding more to give a fuller coverage.
  2. Work out your skin type.
    • If you have dry skin you will appreciate a moisturising or oil-based foundation. Ideally choose one with anti-aging properties (even if you don’t feel old enough) because foundation will settle into any fine lines or dry patches on your face.
    • If you have combination skin that has some shine in your T-zone (forehead, nose and chin) and some drier areas you need to determine which area bothers you the most.  If you are frustrated by the shine use an oil-free or water based foundation that gives a matte finish and use a heavier moisturiser on your drier zones prior to application. If dryness is more of a problem use a moisturising makeup and apply loose powder over your make-up to your T-zone to minimize the shine.
    • Problem skin that is prone to blemishes definitely needs an oil-free foundation. Matte finish and long-lasting make-up will generally be more drying on your skin and less likely to cause breakouts. However make sure it is non-comedogenic – that is it will not block pores.
    • Sensitive skin is the hardest of all to find a good non-irritating foundation.  Firstly make sure it is fragrance free and non-comedogenic. Some will say “dermatologist tested”. Hypoallergenic is very important if you are sensitive. Hypoallergenic means less likely to cause a reaction so you still may react.  Unfortunately for someone with sensitive skin it is trial and error because each person reacts differently.
  3. Work out your budget.  Keep in mind though that Bridge (mid-range) or Budget cosmetics may not always be the most economical. Some Bridge cosmetic brands cost $35-$50 and the bottle will last only 6-8 weeks. Some Prestige brands have make-up for $65-$90 and have 4-6 months worth of daily applications. This can often be much better value.
  4. Match your skin tone. Always test your foundation on your jaw line, never on the back of your hand. For sensitive skin I would recommend a small test patch for reactions on the inside of your wrist before applying to your face.  Preferably your foundation should blend well with your natural skin tone and not look like a painted line. Depending on the season, if it is Spring and you spend time in the sun you may decide to lean toward a slightly darker shade coming into Summer. In Autumn you may opt for a slightly lighter shade ready for Winter.   Always pick a match as close as possible to your skin tone.  If you want to look more tanned don’t buy a darker shade use Bronzer over a closely matched foundation.Foundation testing

I like to try a new foundation on for a few hours before purchasing it. Sometimes it may be too drying or too moisturising or you may have a reaction. Sometimes depending on your acid levels and undertone colouring of your skin the make-up may turn pink or yellow. It is like an investment in your appearance. You want to get it as close to perfect as possible.

Applying Bronzer

Want that radiant sun-kissed look but without the fake-tan-gone-wrong  look.  For a natural looking colour Bronzer is the way to go.

All you need is a good quality bronzing powder & large bronzing or powder brush.

However applying the right amount of Bronzer can be tricky. There is a fine line between toooooo much bronzer and the right amount.  It is always better to start applying a small amount and add more if you need to. You can build on it but it is more difficult to diminish if you apply too much.

Brush on your bronzer after applying your foundation. If you set your foundation with a powder use the bronzer over the powder.

The E-3 method takes the guess work out the application. Use the brush to apply the bronzer tracing a E on one side of the face then an 3 on the other. Starting on the forehead sweep the brush down and around to the cheek to create the top half of the 3 now sweep down and around to the chin to create the bottom half of the 3.  Repeat on the other side of the face.

Brush a little under the jaw line to give the whole face a lift. Finish with a light sweep down the nose.

E3 Bronzer Application

For a natural bare look with a hint of healthy glow lightly apply your bronzer directly over your moisturiser add a little tinted lip gloss and you are ready to go.

Remember Practice makes Perfect.

Setting a table

Years ago, I went to a divine gala dinner.  The ladies were exquisite in long, colourful dresses glistening with jewels and the men looked handsome in suits with bow ties. The room was stunning with fairy lights sparkling, crystal glimmering, light music from the string quartet, gorgeous covered chairs with sashes, elegant tablecloths with runners and amazing table centres.  When I found my seat l saw there were 5 glasses in my place setting. This was daunting to say the least.  I was instantly intimidated. I looked down at the flatware (knives, forks and spoons) and panicked. 4 forks! 5 glasses! I am not a novice to formal dining but I was suddenly very conscious of my table manners.

With a formal place setting it is easiest to remember to work your way in from both sides. If you are setting a table for a formal occasion simply take out any flatware that does not match the courses served. For example if there is not a cocktail course or a soup course being served then these items are removed. Your salad fork should be in order of when the salad course is served. Occasionally the salad course may be after the dinner (main) course depending on the culture and what is served. Make sure all the knife blades face the plate.  That weird looking knife is a fish knife.  They are not sharp and are intended to flake the fish meat apart as fish does not really need cutting. Line the cutlery up so the bases are about an inch from the table edge.  Bippity, Boppity, Boo and you are ready.Formal Table Setting

Sorry the image is a little blurry. My technological skills are still developing. Click on the link to get a clearer formal table setting layout: Formal Table Setting

So often we say to friends “Let’s do dinner sometime”. With all the reality-TV cooking shows for inspiration, why not host a dinner party.  It can be fun and a lot more relaxing than a restaurant. It need not be a formal 7 course dinner and besides if you are like me I don’t own that much flatware. We don’t entertain often so a small dinner party for 4 with an informal setting is ideal. Informal table settings have fewer utensils and plates.  It is easy to follow remembering the working in from the outside principle, again.   If you are setting a table simply omit any cutlery that does not match the food. Ensure all the cutlery is set with an invisible base line an inch from the table edge and the knife blades turn in toward the plates.   Informal Table Setting

Again click on the link to get the informal table setting layout in a less-blurry format: Informal Table Setting

Bon appetite!

Quick way to Hem Pants

Have you ever noticed someone in pants that are too long and the hem is torn and tattered? Apart from “How untidy!”, have you thought “What a waste of a good pair of trousers”.

Ideally the best answer is to find a friend who knows how to sew a blind hem and persuade them into fixing your wardrobe. This can become costly in terms of cocktails on your next night out. It is understandable that not everyone can sew but there are a couple of tricks that can save not only your image but also a pair of pants and your money.

A short-term fix is double sided tape. This can easily be applied to the inside between the pant leg and where the correct hem length for you would be. Shorter trousers in an instant.  This is also very handy for when your skirt hem has come down and you only have 5 minutes before a meeting. Only one problem with this is if you wash in hot water it will lose its adhesive over time.

Double-sided Tape

The best trick I have found is iron-on webbing tape.  You simply trim the length you want and iron it on between the 2 layer: the pant leg and where you wish the hem to be. Just like magic.

Iron-on Webbing

It is most important to make sure you measure the legs against each other so they are both the same length. Monumental error – one pant leg shorter than the other! Or maybe you could start a new fashion trend. Not sure it would catch on.

The iron-in webbing tape’s adhesive holds well under heat from both the washer and dryer. It is inexpensive and can be found in major supermarkets and fabric shops.  This solution is definitely heaps cheaper and quicker than a tailor.

finished